Part I: Account Setup
You will only have to do this once.
- Log in using your Andrew userid and password, but type your userid as
myuserid@ANDREW.CMU.EDU. Note that the hostname must be uppercase.
- Start Firefox by clicking on the globe icon at the top of the screen.
- Open a gnome-terminal by going to the pulldown menu at the top of the screen
and selecting Applications > Systems Tools > Terminal.
- Run the setup script by typing this command in your terminal window:
> /afs/cs/academic/class/15494-s09/utils/setup-account
- In your gnome-terminal, select Edit and then Current Profile.
Click on Colors, disable the default system color scheme, and select
white on black. Then click OK to save your change.
- Logout and log back in again.
Part II: Chiara Familiarization and Powerup
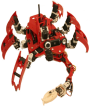
Take a minute to look over your Chiara. Note the id number (1 through
6) taped to the top panel. With the power off, it's safe to gently
move the legs and arm, but do not move the gripper if one is
installed. (The gripper uses delicate microservos that can be damaged
by backdriving them.)
Familiarize yourself with the back panel of the robot. Read the
lettering surrounding the toggle switch at the top of the panel. Then
follow these steps to boot your Chiara:
- Make sure the a/c power adaptor (black plug) is plugged into the
Chiara's external power jack.
- Flip the toggle switch (system power) to the right. This
connects the Chiara to external power. (Flipping the switch to the
left would run the Chiara on battery power.) The blue robot power
light above the external power jack should come on, and you should
hear one short beep from the AX-S1 sensor module.
- Power-up the Pico-ITX processor by pressing the round black
pushbutton. A second blue light, located above the pushbutton, should
go on. This is the Pico-ITX power indicator. The yellow light above
it, that should be flashing intermittently, is the disk access light.
You should feel a slight breeze coming out of the Pico-ITX fan exhaust
port on the top panel.
- The Chiara will boot in a minute or two. Connect to it via ssh,
with userid "student". If you're using robot #1, then type "ssh
student@chiara1".
- Start a ControllerGUI running on your workstation:
> ControllerGUI chiara1
- To start Tekkotsu running on the Chiara, type this in the shell
on the Chiara:
$ cd ~/project

$ ./tekkotsu-CHIARA
When Tekkotsu has completed its initialization and is ready to accept
commands, it will say "Chiara ready". You'll also notice that the
ControllerGUI window comes alive and displays a command menu.
- In the ControllerGUI menu, go to File Access > Play Sound.
Click on a sound file, then hit [Return] to play the sound. (You can
also double-click on an item to select and confirm in one step.)
Use the Back button to return to the Root Control menu.
- Click on the Raw Cam button to to display the current camera image.
- Make sure you are back at the Root Control menu, then click on
the "H" button (in the Teleop row) to launch the Head Remote Control.
This will allow you to move the head around. (You should always be at
the Root Control menu when launching any of the other monitoring tools
because of a known bug that is too obscure to explain here.)
Part III: Powering Down
- Stop Tekkotsu by typing control-D or "quit" in the console window.
- Press and release the large black pushbutton on the Chiara's back
panel. This tells the computer to power itself down, which takes
about 15 seconds. When complete, the blue computer power light will go
out.
- Now move the toggle switch back to the neutral position, shutting
off robot power and extinguishing the system power light.
Part IV: Walking the Dog
This will give you a chance to play with the Chiara's walk engine.
The current one is going to be replaced with something more
sophisticated, but what we have now is pretty good.
- Unplug the external power cord.
- Power up your Chiara using the battery (flip the toggle switch to
the left this time) and start Tekkotsu. Note that the
ControllerGUI automatically reconnects.
- Gently place the Chiara on the floor. Lift it from the bottom by
gripping the battery and the big red base plate.
- In the ControllerGUI, choose Mode Switch from the menu and then
XWalkEdit to activate the Walk Remote Control. Take the robot for a
short walk.
- When you're done with your walk, power down the robot and put it
back on the table. For the next part of this lab we will want to use
external power so the battery doesn't run down. You cannot switch
from battery to external power without crashing the computer, so power
it down gracefully instead.
Part V: Compiling Tekkotsu Behaviors
- Go to you project directory (on your workstation - not on the robot):
> cd ~/project
- Copy the standard behavior template to create a new behavior:
> cp templates/behavior.h MyButtonDemo.h
- Edit MyButtonDemo.h to fill in the template for the MyButtonDemo
class. Specifically, replace CLASSNAME with MyButtonDemo, and replace
DESCRIPTION and YOURNAMEHERE with appropriate text.
- In the body of MyButtonDemo's DoStart() method, add the following
startup code (note: please change userStart to DoStart and userStop to
DoStop):
std::cout << "MyButton is starting up." << std::endl;
Put a similar message in the shutdown code in the body of the DoStop()
method.
- Have your behavior subscribe to button press events in the
DoStart(), and have processEvent print a different message for the
green vs. the yellow button. (The red button will eventually be used
for Emergency Stop mode.) Note that the button offset names used as
source IDs in button events are defined in
~/Tekkotsu/Shared/ChiaraInfo.h.
- Edit the file ~/project/UserBehaviors.h to add MyButtonDemo in two
places: a #include entry, and a MENUITEM entry. Just follow the
example for HellowWorldBehavior. Note that since your behavior is in
the project directory you don't need to specify a path for it, just
#include "MyButtonDemo.h".
- In your project directory, type "make" to compile Tekkotsu. If
the compilation succeeds without errors, the system will tell you
that you may now want to run tekkotsu-CHIARA. But don't run it
on your PC.
- Power up and boot the Chiara using external power, and ssh in.
- To copy your executable to the Chiara, type "getmycode xxx@ANDREW.CMU.EDU" to
the Chiara, where xxx is your Andrew userid.
- Once you've copied the executable, replacing the previous version
of tekkotsu-CHIARA, you can run it on the robot.
- Verify that MyButtonDemo appears in the Root Control > Mode Switch menu.
- In order to get your behavior to receive button press events, you
need to work around a glitch in the software that hasn't been fixed
yet. After starting Tekkotsu, type the following to the HAL:Chiara>
command line prompt:
set Sensors.Source=SSC
Now your robot can get button events, but it cannot safely move its joints, so leave
the teleoperation controls alone.
- Test your code by activating MyButtonDemo and pressing some buttons.
- When you're done testing, power the Chiara down again.
Part VI: Charging the Battery
If you run the Chiara on battery power, you should recharge the battery when you're done:
- Disconnect the external power plug.
- Plug the charger cable into the white plug just beneath the
external power jack. Set the charger mode switch to 1.8 amps.
- Flip the Chiara's toggle switch to the right. The charger's red
light should come on.
- If you're in the lab and you see that a charger has switched from
a red light to a green light, flip the Chiara's toggle switch back to
the neutral position. The battery is fully charged.
Dave Touretzky and
Ethan Tira-Thompson
|