SolidWorks Intro Part 1
Dave Touretzky
Starting Up
- Log in using your Andrew ID.
- Use the Start button, search for and run program: "Solidworks 2023 x64"
First Time With SolidWorks
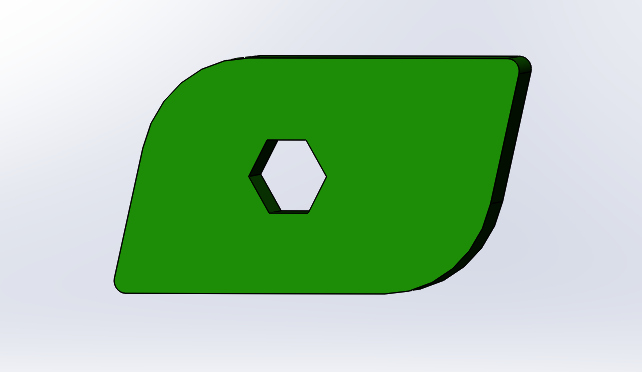
We'll make this part:
- If the SolidWorks Resources fly-out menu is visible on the right side, click in empty space to collapse it.
- New part
- Use IPS as default units
- Extruded base
- Select front plane
- Select rectangle tool
- Note different types of rectangle available; stick with the default.
- Move mouse and note snap-to lines above or beside the origin.
- Draw a rectangle away from the origin, about 1.5 in wide by 1 in high.
- Note the rectangle tool is still active.
- Green checkmark to confirm, or escape to exit the rectangle tool.
- Click on the polygon tool.
- Draw a hexagon lying entirely inside the rectangle.
- Notice the snap-to lines as you move the mouse.
- Hit escape to exit the polygon tool.
- Look in the top right corner for the Exit Sketch icon.
- Click on Exit Sketch.
- Now we've popped back to the Boss-Extrude dialog.
- Change the depth to "1/8 in", which matches our acrylic.
- Look in the top right for the green OK checkmark, and click it.
- Look at the Feature Manager Tree:
- The root is Part1.
- Notice the Boss-Extrude1 feature.
- Mouse buttons:
- Left click on a face to select the feature and bring up a shortcut menu.
- Left click in empty space (or hit Escape twice) to deselect.
- Scroll wheel to zoom.
- Middle button to rotate about screen-x and screen-y.
- Alt-middle button to rotate about screen-z.
- Control-middle button to translate.
- COMMON MISTAKE:
- Use the scroll wheel to zoom WAY past the part so you can't see it.
- Rotating won't help.
- Scrolling won't help if you don't know which way to go (in or out).
- Type "f" to fit the part in the window. Easy fix!
- Or click on the "zoom to fit" icon at the top of the screen.
- Let's go back and edit the sketch again. Three ways to do it:
- i) Left click on a face.
- ii) Left click on the feature in the Feature Manager tree.
- iii) Open the feature (click on the "+" sign) and click on the sketch icon that will appear below it.
- All of these bring up a shortcut menu.
- Select the edit sketch icon from the menu.
- Type a <space> to get the views menu and select "normal to".
- DO THIS ONCE:
- Right click on the Sketch tab next to the Features tab.
- Click on "Customize..." at the bottom.
- Go to the Commands tab.
- Scroll down to and click on Standard Views.
- Click and drag the "Normal To" tool to the sketch toolbar.
- Click OK to close the Customize window. You can also use control-8 as a keyboard shortcut for Normal To.
- Back to editing our sketch:
- Click "Normal To" or type control-8.
- Click on the right vertical line.
- Look at the properties tab.
- Select the "Vertical" relation and delete it.
- Grab the top right point and drag it; now we have a quadrilateral.
- Control-Z to undo.
- Control-Y to redo.
- Escape to exit.
- Click on the Exit Sketch icon.
- Rotate the part so you can see the corner edges.
- Switch to the Features tab.
- Click on the top right edge and select the Fillet tool.
- Set fillet radius to 0.05 in.
- Add the bottom left edge, but not the other two edges.
- Click on a FACE to see what happens. Click again to de-select.
- Click the green checkmark to accept.
- Look in the Feature Manager tree and see two features: Extrude1 and Fillet1.
- Create a new fillet feature for the top left and bottom right corners; set the radius to 0.5 in.
- Complete the fillet by clicking OK.
- Click on a face and select the Appearances icon.
- In the appearances pop-up menu, click on the part name.
- Select a color from the pallette and click OK.
- Grab the rollback bar and roll back the two fillets.
- Then roll it down again to bring back the fillets.
DIMENSIONING
- Edit the sketch again.
- Click on the Smart Dimension tool.
- Select the left vertical line and set its length to 1 inch.
- Select the bottom horizonal line and set its length to 1.6 inches.
- Select the right line and then the top line, and set their angle to 75 deg.
- Select the circle inside the hexagon and set its diameter to 0.3 inches.
- Escape to exit the Smart Dimension tool.
RELATIONS
- Edit the sketch again.
- Click Normal To.
- Click on the left vertical line; observe the Line Properties.
- Shift-click on the right vertical line; now two lines are selected.
- Click on the Equal relation.
- Observe the error, then click on the OK checkmark in the property editor.
- Click on the left vertical line.
- Click on its Vertical property and hit Delete to remove it.
- Click OK to accept the sketch. Looks nice!
- Edit the sketch again.
- Click Normal To.
- Drag the bottom left point to the origin.
- Notice that the parallelogram has turned black. No lines are draggable.
- The parallelogram is now "fully defined".
- Click on one line of the hexagon.
- Give it the Horizontal property.
- Click on the Smart Dimension tool.
- Click on the point at the center of the hexagon, then on the bottom line.
- Set the distance to 0.48 inches.
- Escape to exit.
- Click on the Smart Dimension tool again.
- Click on the point at the center of the hexagon again.
- Now click on the origin point.
- Slide the mouse around and watch the dimension change type.
- Bring the mouse horizontal in line with the point to get a horiz. dimension.
- Set this dimension to 0.8 inches.
- Now the sketch is fully defined.
- After you've completed a dimension, you can click and drag to reposition it.
- Click Exit Sketch.
- Click on File -> Save As and save your part as MyFrob.SLDPRT.

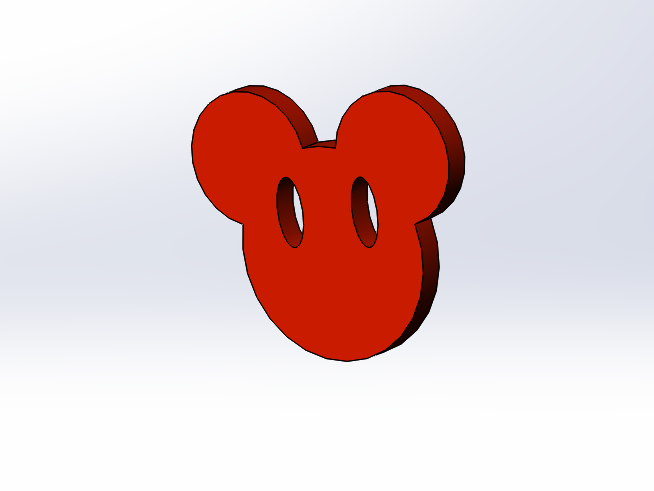
Now we'll make this part:

- New Part
- Extruded Base on the Front Plane.
- Make a circle centered on the origin, radius roughly 1 inch.
- Dimension it to 2 inch diameter.
- Click Exit Sketch, set extrude depth to 1/8 in, and click OK.
- Now we want to make another sketch on the Front Plane...
- Click Extruded Base.
- Open up the object tree by clicking the + next to the Part name.
- Select Front plane.
- Get a normal view by typing space and clicking on the Normal icon (or type control-8).
- Make smaller circle above and to the left of the big one, radius roughly 0.27 inches (do not dimension it), that intersects the first circle somewhere in the top left quadrant.
- On the line tool pulldown menu, select Centerline.
- Draw a centerline straight up from the origin for about 1.5 inches.
- Notice the line property: "for construction", indicated visually by dashes.
- Hit Escape to exit.
- Click on the Mirror Entities tool.
- Select the small circle for Entities to Mirror.
- Click in the Mirror About box and select the centerline.
- Click OK to complete the mirror.
- Click and drag on either small circle to change the size.
- Click and drag on the center of either small circle to change position.
- Click OK to accept the sketch, and set depth to 1/8 in.
- Click on Extruded Cut.
- Click on the face of the part.
- Draw a vertical ellipse to serve as an eye for the face:
- Click on the ellipse tool.
- Click to indicate the center of the ellipse.
- Move mouse down to adjust the size and major axis orientation.
- Click again to accept the size. (If you double-click, the ellipse will be frozen in an incomplete state; click a third time to proceed.)
- Move mouse to the right to adjust the width.
- Click one more time to accept the width.
- Add a centerline as before.
- Mirror the ellipse.
- Click and drag on the bottom point of the ellipse to tilt the eyes.
- Click Exit Sketch.
- In the Cut Extrude dialog, change Blind to Through All.
- Click OK.
- Set the part appearance to red.
- Save your part as Mickey.SLDPRT.
