15-494/694 Cognitive Robotics: Lab 4
I. Software Update and Initial Setup
- At the beginning of every lab you should
update your copy of the cozmo-tools package. Do this:
$ cd ~/cozmo-tools
$ git pull
- For this lab you will need a robot, a charger, a Kindle, and some light cubes.
- Log in to the workstation.
- Make a lab4 directory.
- Place the robot on the desktop facing sideways (away from the edge).
- Hide the cubes behind the robot so he can't see them.
- Connect the Kindle to the robot and start simple_cli.
- Make sure the robot is in radio contact with the cubes even though he can't see them. Type "cube1" in simple_cli and it should show up. Make sure the robot is talking to your cubes and not someone else's.
- Type "show viewer" in simple_cli so you can see what the robot sees. He should not be seeing any cubes!
II. Examining Cozmo's Built-In Localization
- For this part you must pay careful attention to the instructions, and never move the robot manually unless explicitly told to pick it up and put it down. All other robot motion should be done via Turn(n).now(). Also, do not move the cubes unless the instructions tell you to.
- Hide the charger so the robot can't see it even if it turns. There should be no cubes in view either.
- What is cube1's initial pose? (Type cube1.pose to find out.)
What about cube2 and cube3?
________________________________________
- Type cube1.pose.is_valid. What do you get? ________________________________________
- Write down the x/y/z poses and origin_id's: Robot: ________________________ Cube 1: ________________________
- Place cube1 (the "paperclip") in front of the robot so he can see it.
- What are cube1's x,y,z coordinates and origin_id now? ________________________________________
- Use your hand to block the robot's eyes and shift the cube slightly. Keep your hand there so the robot can't see it.
- What are cube1's x,y,z coordinates and origin_id now? Is the cube visible? ________________________________________
- Take your hand away.
- What are cube1's x,y,z coordinates and origin_id now? Is the cube visible? ________________________________________
- Quickly pick up the robot by grabbing and lifting him so that his camera points toward the ceiling. Wave him around a little.
- Put the robot down facing away from you, so that cube1 is about 6-7 inches off
his right side and he can't see it. What are the robot's and cube1's poses and
origin_id now?
Robot: ________________________ Cube 1: ________________________
- In simple_cli do
Turn(-90).now()so that the robot is now facing the cube and can see it. What are the robot's and cube's poses and origin_id now? Robot: ________________________ Cube 1: ________________________ - Pick up the robot and wave him around again, then put him back facing away from you, like before. What are the robot's and cube's poses and origin_id now? Robot: ________________________ Cube 1: ________________________
- Now pick up the cube, wave it around a bit, and put it six inches behind the robot, not off its right side. What are the robot's and cube's poses and origin_id now? Robot: ________________________ Cube 1: ________________________
- Do
Turn(-90).now(). The cube should be off the robot's right side and still out of sight. What are the robot's and cube's poses and origin_id now? Robot: ________________________ Cube 1: ________________________ - Do
Turn(-90).now()again. The robot should now see the cube. What are the robot's and cube's poses and origin_id now? Robot: ________________________ Cube 1: ________________________ - Pick up the robot, wave him around, and put him back down in a position where he can see the cube. What are the robot's and cube's poses and origin_id now? Robot: ________________________ Cube 1: ________________________
- What you should have observed in this experiment is that sometimes the robot gets a new origin_id when picked up, and sometimes he doesn't. Furthermore, when the robot turns to bring a cube into view, sometimes that changes the cube's origin_id, but other times it changes the robot's origin_id. Explain the logic behind this: ________________________________________________________________ ________________________________________________________________ ________________________________________________________________
III. Kinematics Engine: Joint Frames
For this and subsequent parts of this lab you may find it helpful to
review the
kinematics lecture slides. Remember the
organization of the 4x4 transformation matrix using homogeneous
coordinates:

- In simple_cli, type
robot.kine.jointsto see the joints. - Type
show kineto see the robot's kinematic tree. This is just a nicely formatted version ofrobot.kine.joints. - With the robot off the charger, zero the lift
using
SetLiftHeight(0).now() - Examine the source code in
~/cozmo-tools/cozmo_fsm/cozmo_kin.py. This file creates the kinematic description of the robot using the Denavit-Hartenberg conventions discussed in lecture. Study how the shoulder joint relates to the base frame, and the lift_attach joint relates to the shoulder joint. - Type
show kine shoulderto see the shoulder joint, which controls the lift. Also look atshow kine lift_attach. - Examine the results of the following expressions. Pay particular
attention to the fourth column of each matrix.
      sj = robot.kine.joint_to_base('shoulder')

      tprint(sj)


      laj = robot.kine.joint_to_base('lift_attach')

tprint(laj) - What is the value of
sj[0,3] - laj[0,3]? ____________ Why isn't it -66? _______________________________ - By experimentation, find the lift height that gives a shoulder
joint angle close to 0 degrees. Note that you will not be able to
use SetLiftHeight to make tiny changes in the lift height; such
requests are ignored. So to change the lift height from 0.1 to 0.15
you should first do
SetLiftHeight(0.6).now()and thenSetLiftHeight(0.15).now(). - What lift height did you settle on? _______________
- Recompute
sjandlaj. Why did one change and one remain the same? (Hint: remember that the joint reference frame does not rotate with that joint.) - Recompute the difference
sj[0,3] - laj[0,3]with the shoulder angle now roughly 0 degrees. What value do you get? _____________ - Raise the lift by doing
SetLiftHeight(1).now(). Then recomputesjandlaj. - Let's make a point pt_base that is 50 mm in front of the base
frame by typing:
Note that pt_base is in homogeneous coordinates.pt_base = geometry.point(50,0,0) - Find the coordinates of pt_base relative to the lift_attach frame by
writing:
What value did you get? ____________________________pt_lift_attach = \
robot.kine.base_to_joint('lift_attach').dot(pt_base)
tprint(pt_lift_attach)
IV. Kinematics Engine: Link Frames
A joint's reference frame does not rotate as the joint angle changes. The angle is actually measured relative to that reference frame. But the link reference frame does rotate with the joint.- Set the lift height to 0.6. Then compare the following:
Why are the translation values (last column) the same?tprint(robot.kine.joint_to_base('shoulder'))
tprint(robot.kine.link_to_base('shoulder')) - Now compare the following:
Why are the translation values (last column) different?tprint(robot.kine.base_to_joint('shoulder'))
tprint(robot.kine.base_to_link('shoulder')) - The joint_to_base and base_to_joint transformation matrices are
inverses of each other, as are the link_to_base and base_to_link
matrices. What result does the following produce?
________________________ltb = robot.kine.link_to_base('shoulder')
btl = robot.kine.base_to_link('shoulder')
tprint(ltb.dot(btl))
tprint(btl.dot(ltb) - We can use np.linalg.inv() to invert a matrix. What
result does the following produce?
________________________tprint(ltb - np.linalg.inv(btl))
V. Defining New Reference Frames
- Consider the kinematic tree between the base frame and the camera frame. The base frame coordinate system has z pointing up and x pointing forward. What is the camera frame coordinate system? _______________________________________________
- A single DH transformation matrix is sufficient to convert any reference frame orientation to any other orientation, but it cannot always reposition the origin of the new reference frame at the same time, since this would require six degrees of freedom but there are only four DH parameters.
- What trick did we have to use to get the camera reference frame set up so that both its orign and orientation are correct? ________________________________
Homework
Note: The homework problems (parts VI through VIII) must be done individually, not in a group.VI. Extending the Kinematic Description
Make your own copy of cozmo_fsm/cozmo_kin.py and modify it by adding the following reference frames:- left_front_wheel and right_front_wheel: the z axis for each wheel should point to the right. The x axis should point forward.
- left_hook and right_hook: these are the hooks on the lift. The z axis should point up and the x axis should point forward.
VII. Kinematics Calculations
Suppose we have an object that is 100 mm in front of the camera's focal plane, and we want to know how far forward of the front axle it lies. If the head is tilted up, the object will not be as far forward of the axle as if the head is pointing straight horizontal. Write a function to calculate the answer using transformation matrices. Then write a program to move the head through a range of head angles (-10, 0, +10, +20, +30, and +40 degrees) and print the answer for each head angle. Write down your results and include them with your hand-in.VIII. Inverse Kinematics: Pointing the Camera
This is a subtle IK problem. Given an object of height h at position (x,y) in base frame coordinates, write code to point the camera directly at the top of the object. First you should turn to the correct heading. Assume this can be done without error. Then you must set the head angle so that the center of the camera (the z axis in the camera reference frame) points directly at the top of the object. Note that the camera reference frame and head joint reference frame are different: the camera rotates around the head joint origin, not the center of the camera image. So you must be careful with your coordinate transformation. Write a program to point the camera accurately. To help you better understand the problem, review these slides on reference frames, and study the diagram below.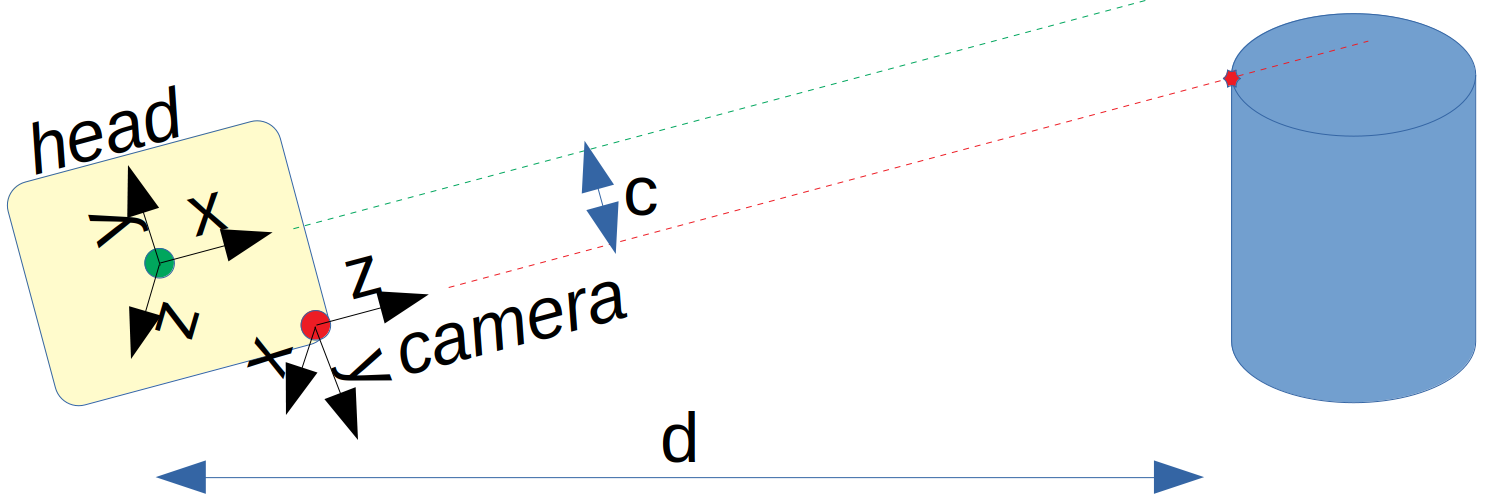
Take an object of known height, such as a soda can, place it at a known position relative to the robot, and run your program. Try different distances, e.g., 75 mm, 100 mm, 150 mm, and 200 mm. How accurately is the top of the object centered in the camera image? Note: you can do "show crosshairs" in simple_cli to help you find the center of the camera image. If you do the calculation correctly you should be dead-on for any of these distance values.