Deliverable 11 - Fall 2024
Due Saturday, November 16, 2024 by 11:59PM
PREPARING YOUR HANDIN FOLDER...
FIRST: Create a folder or subdirectory in your 15-104 working area on your computer or in your Andrew private folder for handin-11. You will put all of your work inside this folder and then compress or zip it to create handin-11.zip to submit to Autolab.
Conceptual Questions (2 points)
In this part of the deliverable, you will download this Word file that contains 4 questions about concepts taught in class. You may download it anywhere on your computer. You should fill in your answers in the spaces provided, and include your name, andrewID and section letter at the top of page 1.
Once you are finished with this part of the deliverable, print/save it as a PDF and store this PDF in your handin-11 folder with the name andrewID-11-concepts.pdf. For example, if your andrewID is acarnegie, then you would save the PDF under the name acarnegie-11-concepts.pdf.
Technical Assignment 11: Turtle Meander (3 points)
In this Assignment, you will use Turtle Graphics to render a series of meanders. This assignment also demands the use of helper functions and loops to help create a complex image.
Background
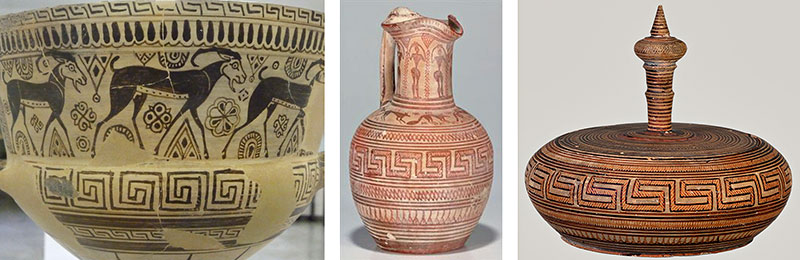
Meanders motifs on Greek vases, 1st millenium B.C.E.
A meander or meandros (Greek: Μαίανδρος), also called a Greek fret or Greek key, is a decorative border constructed from a continuous line, shaped into a repeated motif. Meanders are common decorative elements in Greek and Roman art, used as running ornaments. On one hand, the name “meander” recalls the twisting and turning path of the Maeander River in Asia Minor, and on the other hand, as Karl Kerenyi has pointed out, “the meander is the figure of a labyrinth in linear form” [Wikipedia].
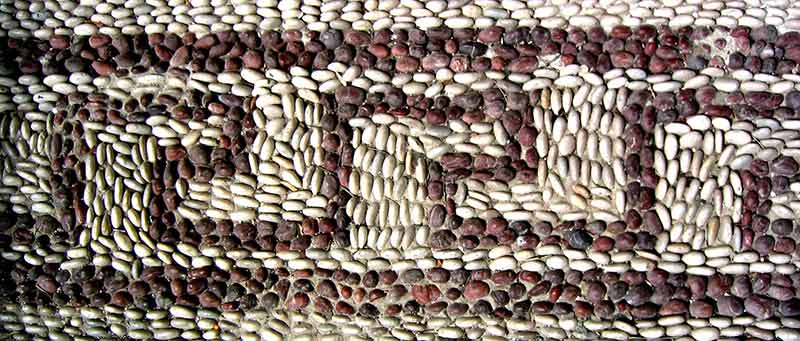
A meander, in pavement on the Greek island of Rhodes (source: Wikipedia)
The meander, we are reminded, is like the zig-zagging course traced by someone… someone, perhaps, like our Turtle.
Programming Instructions
For this technical assignment, you will use our p5.js Turtle Graphics API to render an image that simulates this meander pattern of a golden color on a blue background:

- Observe the above design carefully, looking for pattern(s). Trace this out with your finger, making a note of when you turn left, when you turn right, and how far you travel on each leg of the motif. Note where you need to raise and lower the pen, if necessary. Look for part of the pattern that repeats and can be put into its own (helper) function.
- Using our p5.js lightweight sketch template, prepare a canvas whose dimensions are approximately 300 x 500. Using Turtle Graphics, you are asked to render the entire meander onto the same canvas. You will render them all in one single frame, using noLoop() so that the draw does not repeat itself.
- You should include the turtle.js code as part of your sketch.js file. This code is available in the code sample file from Lecture 26 on Canvas. Copy the turtle.js file into the same folder as this assignment and alter the index.html file so that it loads turtle.js as well as sketch.js.
- Using pencil and paper, take a moment to figure out “irreducible unit(s)” in the image above. You must use an iterative code structure and helper function(s) to direct your Turtle to repeat these units across the canvas. You should try to minimize the number of times the pen is raised and lowered.
- For full credit, you must write a helper (user-defined) function for each fundamental unit in the drawing that you find and then use loops to call the functions as needed. Your code should be modular. Look for repetitions and reduce the amount of code by using these extra functions. We expect this program to be as short as possible, given that there is a lot of repetition in the picture.
- Your turtle(s) should draw a golden line against a blue background. We strongly recommend you set your strokeWeight so that the thickness of the lines resembles the image, your strokeJoin to MITER, and your strokeCap to PROJECT. Your result should look as close to the image above while following the given guidelines. (NOTE: The image above was NOT generated in p5.js.) Think about how to create the interesting lighting effect in the background so the background is not just one solid blue color. (You can paint a solid blue but you won't get the maximum 3 points.)
- Continue to follow our coding style guidelines and document your code for anything that doesn’t seem obvious. Poor style and minimal/no documentation can lead to a 1 point deduction.
Open-ended Project 11: Generative Landscape (3 points)
Create a program which presents an ever-changing (generative) and imaginative “landscape”. Come up with a concept, and populate your landscape with features and objects that are suitable for your concept: perhaps trees, apartment buildings, huts, vehicles, animals, people, asteroids, sea anemones, food items, body parts, hairs, zombies, etc.

The landscape should move past the “camera”, but you can elect the way in which it does so; for example, it might appear to scroll by (as if you were looking out the window of a train or submarine); or approach from a first-person point of view (as if you were driving); or slide underneath (as if you were looking out of a glass-bottomed airplane). The camera might be viewing an outside environment, or viewing objects on a conveyor belt, etc.

Some possibilities to consider:
- people + trees + buildings (According to Jungian psychology, these are the “three verticals”, the basic psychological features of landscapes)
- foreground, middleground, and background “layers”
- variation at the macro-scale, meso-scale, and micro-scale.
- surprise: unusual and/or infrequent items in the landscape
(Even the Simpsons had some fun with this! Watch here.)
Requirements:
- Sketch first on paper.
- Create your landscape in p5.js.
- Your assignment must incorporate at least two types of JavaScript Object that you yourself have defined (i.e. “building”, “vehicle”, etc.) where the objects we see are instances with randomized properties (such as their number of floors, color, etc.)
- Limit your design to a canvas which is no larger than 480 x 480 pixels, please.
- Submit your code via Autolab as usual in a project folder within your zip file.
Programming Hints:
- Keep an array of objects that you are displaying in your landscape. For each frame, update the objects’ positions and tell each one to draw themselves. Think about some random things that you can do to make the landscape display interesting. (e.g. as you’re buildings are scrolling, have one window turn its light on or off).
- Work in increments. Don’t try to code everything at once. Start with one object and define it to have just a few features. Get the animation scroll to work correctly first. Then go back and update that object or add your second object.
Here are some code to help you understand how you could get started.
The following program generates a row of Building objects, which continually slip out of view. New buildings are randomly added from time to time (with a low probability). Buildings have a random number of floors. This is a starting point for your program, but it should be significantly more creative than this for full credit.
var buildings = [];

function setup() {
    createCanvas(640, 240);

    // create an initial collection of buildings
    for (var i = 0; i < 10; i++){
        var rx = random(width);
        buildings[i] = makeBuilding(rx);
    }
    frameRate(10);
}

function draw() {
    background(200);

    displayStatusString();
    displayHorizon();

    updateAndDisplayBuildings();
    removeBuildingsThatHaveSlippedOutOfView();
    addNewBuildingsWithSomeRandomProbability();
}

function updateAndDisplayBuildings(){
    // Update the building's positions, and display them.
    for (var i = 0; i < buildings.length; i++){
        buildings[i].move();
        buildings[i].display();
    }
}

function removeBuildingsThatHaveSlippedOutOfView(){
    // If a building has dropped off the left edge,
    // remove it from the array.  This is quite tricky, but
    // we've seen something like this before with particles.
    // The easy part is scanning the array to find buildings
    // to remove. The tricky part is if we remove them
    // immediately, we'll alter the array, and our plan to
    // step through each item in the array might not work.
    // Our solution is to just copy all the buildings
    // we want to keep into a new array and then make that
    // the buildings array.
    var buildingsToKeep = [];
    for (var i = 0; i < buildings.length; i++){
        if (buildings[i].x + buildings[i].breadth > 0) {
            buildingsToKeep.push(buildings[i]);
        }
    }
    buildings = buildingsToKeep; // remember the surviving buildings
}

function addNewBuildingsWithSomeRandomProbability() {
    // With a very tiny probability, add a new building to the end.
    var newBuildingLikelihood = 0.007;
    if (random(0,1) < newBuildingLikelihood) {
        buildings.push(makeBuilding(width));
    }
}

// method to update position of building every frame
function buildingMove() {
    this.x += this.speed;
}

// draw the building and some windows
function buildingDisplay() {
    var floorHeight = 20;
    var bHeight = this.nFloors * floorHeight;
    fill(255);
    stroke(0);
    push();
    translate(this.x, height - 40);
    rect(0, -bHeight, this.breadth, bHeight);
    stroke(200);
    for (var i = 0; i < this.nFloors; i++) {
        rect(5, -15 - (i * floorHeight), this.breadth - 10, 10);
    }
    pop();
}

function makeBuilding(birthLocationX) {
    var bldg = {x: birthLocationX,
                breadth: 50,
                speed: -1.0,
                nFloors: round(random(2,8)),
                move: buildingMove,
                display: buildingDisplay}
    return bldg;
}

function displayHorizon(){
    stroke(0);
    line (0,height-50, width, height-50);
}

function displayStatusString(){
    noStroke();
    fill(0);
    var statusString = "# Buildings = " + buildings.length;
    text(statusString, 5,20);
}
Handing in your work
Your handin folder handin-11 should have the two folders described above.
You will zip up the handin-11 folder and submit this to Autolab. Your overall folder organization should look something like this (indentation indicates subfolders):
  handin-11
    andrewID-11-assignment
      index.html
      sketch.js
    andrewID-11-concepts.pdf
    andrewID-11-project
      index.html
      sketch.js
Once you are ready to submit, zip (compress) the handin-11 folder (which will likely be named handin-11.zip) and hand in the ZIP FILE into the Deliverable 11 submission area on Autolab. Once you handin, check your handin history and click on the magnifying glass to look at what you submitted to make sure it looks right. IF YOU SUBMIT THE WRONG ZIP FILE, YOU RISK GETTTING A 0 ON THIS DELIVERABLE!
You may submit as many times as you’d like (in case you find inspiration and want to improve your work) up until the deadline. If you submit up to one day late, even if you submitted on time, you will be marked late. We only grade the final submission you upload to us via Autolab.