Creating surface meshes from range images
When converting a range image into a surface mesh, we must simultaneously
satisfy three criteria:
- represent the original shape of the terrain
- minimize the size of the representation
- ensure that the surface normals will be stable between views
To accomplish this, we perform the following steps on the input range images:
- filter bad points
- remove range shadows
- convert to a surface mesh
- simplify and smooth the mesh
For ground-based sensing, we use the Ben Franklin 2 laser rangefinder. It
produces range and reflectance images in a 360 x 30 degree field of
view. The images are 6000 x 300 pixels. The example view below is
cropped to about 120 degrees in the forward direction. It is the first
in the mesa data sequence and looks down a road between two hills. In
the distance, the road and the right-hand hill both curve to the left.
The examples below show how this range image is converted into a surface
mesh.

|

|
|
Two views of the BF2 laser rangefinder mounted on Navlab 5.
|

|

|
|
Example input images from the BF2: range image (left) and reflectance image (right)
|
Step 1: filter bad points
We apply several filters to remove bad points from the range image. Bad
points occur for the following reasons:
- point is outside sensor range (e.g., sky). The sensor returns a low
value for reflectance and an effectively random value for range.
- point is part of the sensing platform (e.g., the roof of Navlab 5).
These self-occlusions must be masked out.
- point has invalid range value. Sometimes, the range value is off by
about 6 meters due to the design of the laser scanner. These points appear
as speckles in the range image.

|
|
Bad points (black) are removed from the range image.
|
Step 2: remove range shadows
Range shadows are caused by occluding edges in the range image. Without
range shadow removal, the points on occluding edges are connected to distant
points on the terrain behind, generating a surface in the
final mesh that does not correspond to any real-world surface. Our
registration algorithm is fairly robust to these phantom surfaces, but at
the integration stage, the surfaces would be incorrectly added to the final
map. Range shadow removal creates holes in the surface mesh, causing
problems with the simplification algorithm, which uses many triangles to
accurately represent the borders of these holes. Therefore, we create two
surface meshes, one with a conservative range shadow removal (used for
registration) and one with a liberal range shadow removal (used for
integration).

|

|
|
An example of range shadow removal
|

|

|
|
Range shadow edge points (white): conservative removal (left) and liberal
removal (right)
|
Step 3: convert to a surface mesh
Once the bad points have been filtered out, conversion to a surface mesh is
straightforward. Each good point in the range image is converted to an xyz
coordinate system. Edges are introduced to connect points that were
four-connected in the range image and along one of
the diagonals.
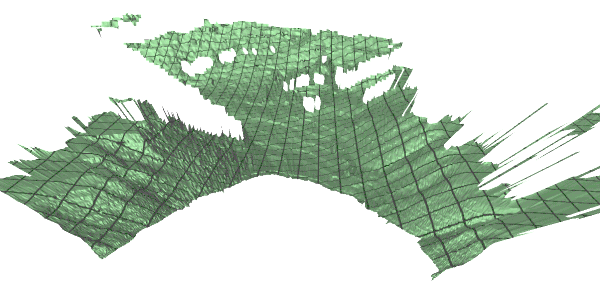
|

|
|
Raw surface mesh: filled (left) and wireframe (right)
|
Step 4: simplify and smooth the mesh
We must simplify the mesh to reduce the number of vertices to the point
where we can perform registration in a reasonable amount of time. We use a
simplification algorithm developed by Michael Garland. This algorithm
removes faces from the mesh while maintaining the mesh's original shape.
As a beneficial side-effect, areas that are relatively flat are represented at a lower
resolution than complex surfaces, thereby concentrating the resolution in the
areas that need it most.
Finally, the mesh is smoothed to increase the stability of the surface
normals. Since spin images are defined with respect to the local surface
normal, unstable normals would reduce the chances of finding corresponding points on
two meshes.
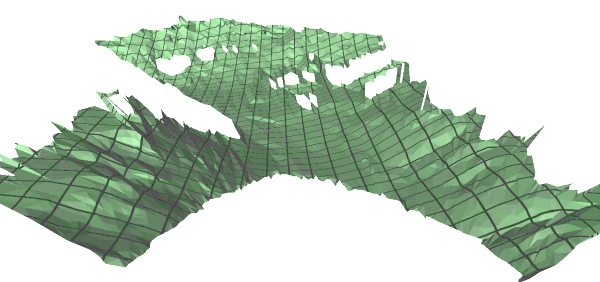
|

|
|
Simplified mesh: filled (left) and wireframe (right)
|

|

|
|
The final smoothed mesh: filled (left) and phong shaded (right)
|
|
Last modified February 15, 1999
Daniel Huber (dhuber@cs.cmu.edu)
|


