wxserpent = serpent + wxWidgets
Roger B. Dannenberg
Introduction
Serpent has no built-in graphics or user interface classes, but
it has been interfaced to parts of the wxWidgets library. Unlike
wxPython, wxserpent is not intended to include all of wxWidgets,
so there is only a very limited subset available. However, this is
enough to construct simple but effective graphical interfaces. For
example, wxserpent was used to create a graphical editor for audio
synthesis algorithms, including pop-up help text, icons with
hot-spots, icons that drag, lines that snap into place, menus, and
file browsers.
This document is likely to be incomplete, so you are encouraged
to read the sources for details, constants, and recent additions.
When you are getting started, you should run wxserpent in the serpent/wxs
directory. The init.srp file here will then be loaded
automatically at startup and create a little window where you can
type text and have it evaluated by Serpent. You can even type
load "filename"
to load a file. You can of course read init.srp and
modify it or install your own version here or in another
directory. Serpent will read from the current directory first, and
then use the search path.
Two-level Implementation
Level 1
wxserpent interfaces to wxWidgets through a fairly small set of C
functions. Because wxWidget objects are not primitives in serpent
(like files for example), the wxWidget objects are accessed via
"handles" that are simply integers. For example, a window might be
designated by the integer 1, and a menu might be named by integer
27. As you can imagine, the C interface code has a simple table
that maps integers to wxWindows objects and then calls methods on
these objects.
This is the low-level, direct interface to wxWindows, and you can
use it if you like, but one of the problems is that when wxWindows
events occur (e.g. the user selects a menu item), a single serpent
method, wxs_handler, is called to handle the event. It is up to
this function to figure out which graphical object, based on the
integer identifier, generated the event, and what to do about it.
Level 2
The standard way to impose some structure on a user interface
system like this is to let objects represent things like menus,
windows, sliders, number boxes, etc. In this scheme, the integer
handles are hidden, and serpent maintains a table to map integers,
not to wxWidget objects, but to Serpent objects that serve as
representations of the graphical objects.
When a menu item is selected, the wxs_handler method finds the
corresponding Serpent object and invokes the handle() method.
Thus, if you use this level, implemented in wxslib/wxserpent.srp,
creating a graphical object is just a matter of instantiating a
class.
Example
Let's go through a simple example. Suppose you want a slider
control. Your serpent program should say something like:
// parameters are: parent, min, max, initial, x, y, w, h
myslider = Slider(default_window.id, 0, 100, 50, 10, 30, 200, 20)
The first parameter tells where to put the slider: this must be
the integer "handle" for a window. When wxserpent initializes,
there is a default window created automatically, and serpent
creates a corresponding sepent object called default_window.
The id field contains the integer handle. The next
parameters specify the minimum, maximum, and initial values for
the slider. The last four parameters are coordinates: left, top,
width, and height. Coordinates are in integer pixels measured from
the upper left corner of the window.
Now we have a slider, and you should see a slider in the window.
How do we get values from the slider? One way is to start over and
make a subclass of Slider where we override the handle
method, but this is so common, there's an easier way. Let's look
at some code to get a thorough understanding. Here's wxs_handler:
def wxs_handler(id, event, x, y):
    var obj = control_map[id]
    if obj:
        if event == WXS_PAINT:
            obj.paint(x)
        else:
            obj.handle(event, x, y)
When an event occurs (e.g. when the slider button is moved),
wxs_handler is called with the number of the slider, a code
indicating the type of event, and the value of the slider as x.
(The y parameter is not used in slider update events.) The
wxs_handler function maps id to a Serpent object. If the event is
a paint request, which is valid for some objects, the paint
message is sent to the object. Otherwise, the parameters are
forwarded to the handle method of the object.
Most objects, including Sliders, inherit the handle method from
their superclass, Control. Here is a simplified version of the
method:
    def handle(event, x, y):
        if method:
            if target:
                send(target, method, event, x, y)
            else:
                funcall(method, obj, event, x, y)
        elif parent:
            control_map[parent].handle(event, x, y)
Every Control has two fields used for message handling: method
and target. If method is set, then this method will be
called to handle the event. If target is set to a Serpent object,
then method will be sent to this target. If target is not set,
then method is regarded as a global function, and the function is
called. Note that the function's first parameter is the object
(the control that gave rise to the event). If method is not set,
there is no handler defined for this object, so the event is sent
to the parent of the object. In the case of our slider, recall
that the parent is the window containing the slider. This
forward-to-parent mechanism could be used if a parent has many
controls as children and wants to handle all of them in one place
(although in practice, it is simple to direct each child object's
events to a designated target.)
OK, so now we're ready to handle some slider events. Try this:
myslider.method = 'print_slider_value'
def print_slider_value(obj, event, x, y):
    display "print_slider_value", obj, event, x, y
Notice that this is a global function, not a method. It will be
called because myslider.target is nil (the default). Also notice
that the handler gets called with 4 parameters even though the y
parameter will never be used. When you move the slider, you should
see text that tells you the value.
In some cases, especially menus, you might want to have different
targets so that one object or function can handle some menu items
and another object or function can handle others. For example,
different subsystems might create help topics on the Help menu. It
wouldn't make much sense to have a single handler for Help. See add_target_method()
below for a solution.
You now know just about everything you need to know except for
the details about what objects you can create and how to create a timer. These are described in the
next section. You should also be warned about error-handling. It's
not pretty. See below.
Default Handlers
Normally, you will install handlers for every object that
produces events you want to handle. If there is no handler, events
propagate to containing windows (either panels or top-level
windows), so there is a chance to catch events there as well. If
you do not provide any handler, there may be a built-in handler,
for example, for the File:Quit menu or window Close buttons.
Unlike many graphical user interface frameworks, wxserpent
assumes that if there is a handler to call, then the event is
handled. There is no need to return true or false to indicate
whether to propagate the event to the next available handler.
There are a few special cases, e.g. what if you want to catch the
File:Quit menu item and save a file or get the user to confirm,
and then you want to invoke the built-in system handler to
quit the application. Within the handler, you can tell the system
"pretend like this handler never existed" by calling wxs_event_not_handled().
See the On Quit/Close
example for more details.
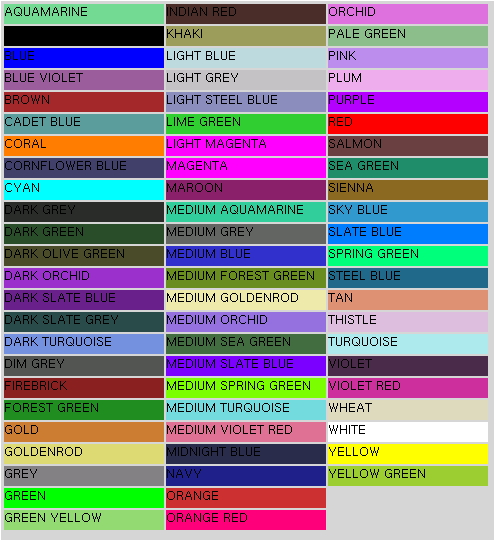
Color
Color is specified in 3 ways:
- By string, e.g., "BLACK". See colors.txt
and color_chart.png.
Methods that take strings are
set_color(), set_pen_color(), set_brush_color(),
set_text_color(), and clear().
- By
Wxs_color, e.g., Wxs_color(192, 196, 240).
A simple Serpent object created
by Wxs_color(r, g, b, optional alpha = 255). A
Wxs_color object may be passed wherever a string
color could be used.
- By RGBA, where red, green, blue, and optional alpha values
are integers from 0 through 255. Methods that take RGBA
parameters are set_rgb(), set_pen_rgb(), set_brush_rgb(),
set_text_rgb(), and clear_rgb().
Graphical Objects
Graphical objects are subclasses of the Control class. There are
some general methods in Control that most objects can use:
- add_target_method(target, method)
- This method adds a target and method to a list of handlers for
the control. Normally, the target and method
fields of a Control are set directly to an object (or nil) and a
symbol denoting a function or method. However, the target
and method fields can be arrays, in which case a call
is made to method[0], method[1],
etc. add_target_method(tar, meth) is a convenient way
to add a target/method pair to a control without removing or
altering any existing target/method pairs. This method simply
sets the target and method fields of the
Control if there is no method. Otherwise, they create
arrays if necessary and append to them.
- delete()
- Delete the wxWidgets control this object represents. You
should not use a Control after calling delete().
- get_left()
- Get the left (x) position in pixels.
- get_top()
- Get the top (y) position in piexels.
- get_width()
- Get the width in pixels.
- get_height():
- Get the height in pixels.
- get_count():
- Get the number of items in the control (works only with
Listbox, Combobox, Radiobox, and Choice.)
- set_size(width, height)
- Set the size in pixels.
- set_width(w)
- Set the width in pixels.
- set_height(h)
- Set the height in pixels.
- set_position(x, y)
- Set the position in pixels, relative to the upper left of the
parent window.
- set_font(size, family, style, weight, underline, name)
- Set font parameters (for text objects only). Font size is in
points. Font family is from the following constants:
- WXS_FONT_DEFAULT - default font.
- WXS_FONT_DECORATIVE - a decorative font.
- WXS_FONT_ROMAN - a roman (serif) font.
- WXS_FONT_SCRIPT - a handwriting font.
- WXS_FONT_SWISS - a sans serif font.
- WXS_FONT_MODERN - a fixed pitch font.
Font style is from the following:
- WXS_FONT_NORMAL - plain.
- WXS_FONT_SLANT - see wxWidgets documentation.
- WXS_FONT_ITALIC - italic.
Font weight is from the following:
- WXS_FONT_NORMAL - normal weight.
- WXS_FONT_LIGHT - see wxWidgets documentation.
- WXS_FONT_BOLD - bold.
The underline parameter is boolean. The name parameter is a
string containing a font face name (see wxWidgets documentation
for the wxFont class; the empty string is an acceptable value
for the name parameter). In addition to these constants, the
WXS_FONT_NORMAL is 0. For example, to change the font size to 24
(large), you can use object.set_font(24, 0, 0, 0, nil, "").
- set_color(color)
- Set the color of an object. Colors are designated by strings,
e.g. "RED", or an Wxs_color object.
See colors.txt for a list
of available colors and their interpretation. Also, see colorchart.png for a color chart
(image).
- set_rgb(r, g, b)
- Set the color of an object using red/green/blue values from 0
to 255.
- set_value(x)
- Set the value. The folowing take an integer value: Gauge,
Spinctrl, Slider, Radiobox, and Checkbox. Checkbox takes 0 or false
(unchecked), or true or 1 (checked). The following take a string value:
Textctrl, Choice, Combobox, Listbox. In the case of Choice and
Listbox, the string must match an existing choice or nothing
happens.
- set_string(string)
- Set the value as a string if the object is a Textctrl,
Multitext, Statictext, Combobox, Listbox, or Choice. Also
sets the title of a Window.
- set_and_act(x)
- Works like set_value(), but calls the handler as if the user
had entered the value through the user interface. Note that
set_value() and set_string() do not invoke handlers; they merely
update the visible representation on the screen.
- value()
- Get the value of this control (not actually defined in
Control, but defined by most subclasses).
-
Positioning and Sizing
Most controls take pameters x, y,
w, h to establish position and
size. When creating control panels with many controls, it is
convenient to use relative positioning rather than using absolute
coordinates. Normally, x, y,
w, h are integers, but some special
symbols can be passed instead:
- To align a control with the previously created control,
either horizontally or vertically, pass
'S' (Same) for x or y;
- To position a control below the previously created control,
pass
'S' (Same) for x and
'D' (Down) as the y parameter;
- To position a control to the right of the previously created
control, pass
'R' (Right) for x and
'S' (Same) for y;
- To match either the width, height, or both, pass
'S' for w or h
parameters;
- To specify the default control height, pass
'H'
for the h parameter.
| Code | Meaning | Applies To |
'S' | Same | x
y w h |
'D' | Down | y |
'R' | Right | x |
'H' | Default Height (25) | h |
In addition, the implementation is very simple and
transparent. (See wxs_compute_coordinates() in
wxslib/wxserpent.srp. Global variables wxs_x,
wxs_y, wxs_w, and wxs_h,
are set each time a control is created. These same variables are
used to interpret 'S', 'D',
'R', and 'H'. For 'R' and
'D' an extra wxs_space (initially 5) is
added. If you want 10 pixels of
extra vertical
space when using 'D', you can simply precede the
control instantiation with wxs_y = wxs_y + 10 or
wxs_h = wxs_h + 10 and pass
'D' for y, which will position relative
to (the updated) wxs_y + wxs_h + wxs_space.
Sometimes, you want to remember where the next control would go,
but create the control later. You can save values of wxs_x or
wxs_y. E.g., to create
two rows of controls, create the first object, and then set
var left = wxs_x. Create successive objects on the row
using 'R' (right) for x and 'S'
(same) for y. To align the second row below the first
object, use left for x and 'D'
(down) for y. (This will position the first object of
the second row vertically according to the last object
of the first row. If
objects in the first row have different heights, you may need to
compute the y based on the maximum height in the
row.)
Classes to Create Controls
Here is a list of graphical objects you can create (these are all
subclasses of Control):
- Button(parent, label, x, y, w, h)
- Creates a labeled button. label is a string. The
handler will be called with event = WXS_BUTTON_CLICKED, and x
and y should be ignored. To invoke the handler from software, call
set_and_act() with no arguments.
- Choice(parent, x, y, w, h)
- Creates a choice box. Use the append(label) method to add
choices (strings) and clear() to remove all labels from the
list. See also set_value(). The handler will be called with
event = WXS_CHOICE_SELECTED, x = the selected label (a string),
and y should be ignored.
- Checkbox(parent, label, x, y, w, h)
- Similar to Button, but this creates a two-state check box. The
handler will be called with event = WXS_CHECKBOX_CLICKED, x =
't' (if the box is checked) or nil (if the box is not checked),
and y should be ignored.
- Combobox(parent, x, y, w, h)
- Similar to a Choice, but you can type in choices as well as
select them. Use append(label) to add choices and clear() to
remove all choices. The handler will be called with event =
WXS_COMBOBOX_SELECTED, x = the selected label (a string), and y
should be ignored when an item is selected. When the user types into the
combobox, the handler is called after each character is typed or
deleted with event = WXS_TEXT_UPDATED, x = the current label (a
string), and should be ignored.
- Listbox(parent, x, y, w, h, multiple)
- Creates a list box. Use the append(label) method to add to the
list and clear() to remove all items from the list. The handler
will be called with event = WXS_LISTBOX_SELECTED, x = the
selected label (a string), and y should be ignored. If multiple (boolean) is
set, the Listbox will allow multiple selections. To retrieve
multiple selections, use the get_count() method to determine the
size, and is_selected(n) to determine if the nth item is
selected. The get_string(n) method can be used to get the nth
string (whether it is selected or not). The method
get_selections() will return an array of all selected strings.
- Multitext(parent, x, y, w, h)
- Creates a multi-line editable text box. The value() method
returns the text. The handler is called after each character is
typed or deleted with event = WXS_TEXT_UPDATED, x = 0, and y
should be ignored. Unlike most controls, the handler is called in response to
set_value() or set_string() (which are equivalent) if the text
changes. A call to set_and_act() will always call the handler
and may call it twice. Use value() to retrieve the text.
- Notebook(parent, x, y, w, h)
- Creates a tabbed set of controls with associated tabs. To add
a page to the notebook, first create a control to be the page, using
the Notebook as the parent. If you want multiple controls
on a page, use a Panel as the page and add controls to the
Panel. Next, use add_page(control, label)
to add the control to the notebook. The control will be resized
by the Notebook object. If the actual size is needed, call get_width()
and get_height() methods on the page control after
calling add_page(). At present there are no events
when the user selects a new page, but the Notebook methods value()
and set_value(i) can be used to get and set the
page number, which is 0-based.
- Textctrl(parent, text, x, y, w, h)
- Creates a one-line text box. The value() method returns the
text. The handler works just like Multitext (see above).
- Spinctrl(parent, min, max, initial, x, y, w, h)
- Creates a spin control The handler is called with event =
WXS_SPINCTRL_UPDATED, x = the spin control value, and y should
be ignored.
- Statictext(parent, text, x, y, w, h)
- Creates non-editable text.
- Radiobox(parent, label, items, x, y, w, h)
- Creates a radio box, where label is a text label and items is
an array of strings to label the buttons. The method value()
returns an integer index (not a string),
item_string(i) returns the string associated with
index i, and set_value(i)
takes an integer index. The handler is called with event =
WXS_RADIOBOX_SELECTED, x = the integer index of the selected
button, and y should be ignored.
- Panel(parent, x, y, w, h)
- Creates a panel, essentially a sub-window with its own local
coordinate system.
- Slider(parent, min, max, initial, x, y, w, h, optional
horizontal = t)
- Creates a slider. The handler is called with event =
WXS_SLIDER_UPDATED, x = the slider value (an integer), and y
should be ignored. The default is a horizontal slider, but if you specify false
or nil for the optional parameter, a vertical slider is created.
Sliders can be resized with set_size(), but at least on OS X, it
does not seem possible to resize smaller than the initial size,
so create the slider at the smallest size you might need and
resize it to the size you want.
- Gauge(parent, range, x, y, w, h)
- Creates a gauge, used to display values or progress as a
horizontal bar. Use set_value(x) to change the
display. Values of range and x are integer.
- Menu(parent, label) - not recommended for direct use, see
Window.get_menu method.
- Add a menu with the given (string) label. The handler is
called with event = WXS_MENU_SELECTED, x = the index of the
selected menu item, and y = the checked status: -1 means this is
not a checkable item, 0 means unchecked, and 1 means checked.
The following methods are available:
- item(label, help, [checkable, [target, method]])
- Add a menu item with the given (string) label, the
associated help string, and the checkable attribute (nil or
true, defaults to nil). Returns an integer that denotes the
item. (This integer is the value of x when a handler is
called with event = WXS_MENU_SELECTED.) Menu items including
separators are normally numbered from zero, but there are
exceptions such as the OS X Help menu being preloaded with a
search box. Do not assume any particular assignment of
these integer item identifiers. If
target and method are specified and method is not nil (the
default), then when the item is selected, target and method
are used to handle the event and the menu target and method,
if any, are ignored. Returns an id that can be
used to call set_and_act or set_checked
- separator()
- Insert a separator (no item number is returned).
- is_checked(id)
- Return true iff the menu item is checked. The id parameter
is the integer identifier returned by an item
method described above. The checked status is also given as
the y value of a WXS_MENU_SELECTED event, where y = 0 means
unchecked and y = 1 means checked.
- set_checked(id, flag)
- Set the checked status of an item.
- set_and_act(id, optional flag)
- Set the checked status of an item (if any) and simulate
the action of the user selecting this menu item. The first
parameter, id, is the integer identifier of the menu item
returned by the item method when the menu item is
created; flag is the check state: true means set the check
mark, false means remove the check mark, and no parameter
means this is not a checkable item. The caller should
provide the second parameter if and only if the item is
checkable.
- item_string(i)
- Return the label string for this menu item. If the
parameter i does not denote an item created with the item
method, nil is returned. For example, here is how to get the
label from a selected menu item:
def file_menu_handler(obj, event, x, y):
    var selection = obj.item_string(x)
    print "You selected", selection
- delete(i)
- Delete the ith item, where i is
the item number returned by the item method. Note
that i is optional. If omitted or nil (false), the
delete() method inherited from the
Control class will be called, which will
delete the entire menu. Before deleting the menu, you
should delete each item using delete(i);
otherwise, the menu items may not be freed.
By default, an "About..." menu item is created. When invoked,
some version information for wxSerpent is displayed in a dialog
box. You can set the string displayed in the dialog box,
changing the default message, by calling:
- wxs_set_about(msg)
- Set the string displayed in the About... dialog box.
- Image(optional w, h)
- Create an image object to be drawn on a canvas. (See the
draw_image method of the Canvas class below.) Unlike other
classes in this list, an image does not have a parent window.
However, it does implement some of the generic methods of
Control, including get_width, get_height, and delete. You can
create an image in two ways: you can draw on an image similar to
a canvas, or you can load an image from a file.
- If you initialize with optional width and height parameterrs a
blank bitmap is created that you can draw on. Drawing works
like a Canvas: you subclass Image and provide a custom
paint(x) method, which can call any of the Canvas drawing
methods. The paint method cannot be invoked directly. Instead,
call refresh(t) on an instance of your Image subclass. This will
immediately call paint (after setting up some internal context
so that the draw commands will work). Once painted, there is no
need to paint an image again, so images can be used to store the
result of an expensive drawing, which can then be copied to a
canvas in one fast draw_image() operation.
- If you do not
initiaize with optional width and height (or pass in nil), you
must call the create method to load an image from a file:
- load_from(filename)
- Dispose of the previous image, if any, and load a new
image from a file. Returns either WXS_IMAGE_NO_FILE,
WXS_IMAGE_CANNOT_READ or WXS_IMAGE_SUCCESS. (This method
could also return WXS_IMAGE_NO_ID if somehow the Image gets
an invalid ID number, or WXS_IMAGE_BAD_ID if somehow the
Image has the ID of a non-bitmap object.) After loading an
image, you can draw the image on a canvas and query for the
width or height.
- rescale(width, height, quality)
- Change the size of the image to width and height. The
quality may be WXS_QUALITY_NORMAL or WXS_QUALITY_HIGH.
- subimage(left, top, width, height)
- Create a new Image object that contains a subarea
specified by left, top, width, and height. The subarea must
be contained within image, otherwise WXS_IMAGE_BAD_SIZE is
returned. The image must not have been drawn to an OpenGL
window or canvas (a restriction in the current
implementation), otherwise WXS_IMAGE_NO_DATA will be
returned. If the operation is successful, the new Image
object is returned. Currently, image and control identifiers
are not recycled, so generating many subimages (e.g. calling
subimage for every redraw) should be avoided. If you must,
you can delete a control, window, or image using the
delete() method. This will free up the allocated resources
that implement the graphics, but not the corresponding
Serpent object, so you should then be sure to destroy
(overwrite) any existing references to the Serpent object,
which will then be automatically garbage collected. The
Serpent garbage collector does not perform any
"finalization" actions, so merely destroying all references
to the Serpent object without calling delete() first will
leave all the graphics resources allocated.
- Canvas(parent, x, y, w, h)
- Glcanvas(parent, x, y, w, h)
- Glwindow(title, x, y, w, h)
- Create a canvas, a drawable region. There are three
variations: Canvas uses a wxWindows wxCanvas object, which has
better support for fonts and incremental updates, but otherwise
is slower. Glcanvas is intended to be a direct replacement for
Canvas using a wxGlCanvas object, which can be an order of
magnitude faster than Canvas. Glwindow is like Window (see
below), but with an embedded Glcanvas.
Before we talk about drawing, note that canvases generate a
variety of events. Mouse events are WXS_LEFT_DOWN,
WXS_LEFT_UP, WXS_RIGHT_DOWN, WXS_RIGHT_UP,
WXS_SHIFT_LEFT_DOWN, WXS_LEFT_DCLICK, WXS_RIGHT_DCLICK,
WXS_SHIFT_RIGHT_DOWN, WXS_MOVE, WXS_ENTER_WINDOW, and
WXS_LEAVE_WINDOW. Keyboard events are WXS_KEYDOWN, WXS_KEYUP,
which report raw up/down key events without processing the
shift key, etc. For text input, probably WXS_CHAR is the best
event to look for because the x parameter will hold
an ASCII character code rather than an unprocessed key code.
There are many methods, but first a word about how this all
works. To create a Canvas (or Glcanvas or Glwindow), you must
make a subclass and define the paint(x) method, which may call
any of the following methods. Except for refresh, the
following methods can only be called after a paint()
method begins and before it ends. The affected canvas will be
the one who's paint method is active. You cannot simply
call draw_line(0, 0, 100, 100) and expect to see a line on
your canvas. Instead, you must first call
refresh(erase). At some point in the future, paint(x) will be
called, and then you will have the opportunity to draw on your
canvas.
Each Canvas has a full-size bitmap that contains the full
canvas image. If the canvas is obscured or for some reason has
to be redrawn, wxserpent will just copy bits from the bitmap.
Drawing methods actually draw on the bitmap; then the bitmap
is copied to the canvas. Although copying the entire bitmap to
update the canvas can be a lot of work, the bitmap copy is
performed by optimized machine code, so the overhead may not
be as great as drawing in the first place. By keeping the
bitmap around, wxserpent programs can do incremental updates
to the bitmap, minimizing the amount of Serpent execution.
This is only possible with a Canvas. Glcanvas and Glwinodow
may use a buffer to avoid redrawing when the window is
uncovered, but any updates to the image or resizing require a
full redraw.
To perform incremental updates, update the state of your
Canvas subclass and call refresh(false). The parameter says
not to erase the canvas. In the paint(x) method (which you
define), if x is false, then refresh was called with false and
paint(x) should perform an incremental update. On the other
hand, if x is true, then either refresh(true) was called, the
Canvas was resized, or some other event occurred that requires
a full repaint of the entire canvas. In this case, the bitmap
will be filled with the background color. Glcanvas and
Glwindow also use the paint(x) method, but the parameter
should be ignored and the full image should be drawn by the
paint(x) method.
Unlike most graphics functions described earlier, most of the
"draw" functions below can take doubles as parameters. These
are rounded to integers in the case of Canvas, but Glcanvas
and Glwindow draw with antialiased lines and polygons, thus it
is possible to use non-integer coordinates.
- draw_line(x, y, x2, y2)
- draw a line from x,y to x2,y2. All parameters are integer
or double.
- draw_point(x, y)
- draw a 1-pixel point at x,y. All parameters are integer or
double.
- draw_rectangle(x, y, w, h)
- draw a rectangle. All parameters are integer or double.
- draw_text(x, y, text)
- draw a string. x and y are integer or double coordinates
for the left of the string baseline.
- draw_ellipse(x, y, w, h)
- draw an ellipse. All parameters are integer or double.
- draw_polygon(points)
- draw a closed polygon. Points are an array: [x0, y0, x1,
y1, x2, y2, ...]. All values are integer or double.
- draw_image(image, optional x = 0, optional y = 0, optional
xscale = 1, optional yscale = 1, optional angle = 0)
- draw an instance of Image at location (x, y) (integer or
double) with scale factors (xscale, yscale) (integer or
double) and rotated by angle (integer or double in radians,
not degrees) on the canvas. Note that you pass in the
Serpent Image object, not the integer id for the object.
Canvas objects ignore scale factors and angle, but Glcanvas
and Glwindow do not. In the current implementation, drawing
an image to a Glcanvas or Glwindow converts the image to an
OpenGL texture, after which other image operations will
fail, including subimage(), rescale(), and drawing on an
ordinary Canvas.
- set_pen_color(color, optional alpha = 255)
- color is a string color name (see set_color() above) or
a Wxs_color object.
Future lines, points, etc. are in this color. The alpha
value is an integer or double from 0 (transparent) to 255
(opaque, the default). For a Canvas, only transparent (zero)
and opaque (non-zero) are supported.
- set_pen_rgb(r, g, b, optional alpha = 255)
- set the color using integer RGB values from 0 to 255. The
alpha works as in set_pen_color(). All parameters
are integer or double.
- set_pen_width(w)
- set the pen width for lines, rectangles, etc. w is integer
or double.
- set_brush_color(color, optional alpha)
- set the color (a string or Wxs_color) with which to fill rectangles,
ellipses, etc. See set_color() above. The alpha value is an
integer or double from 0 (transparent) to 255 (opaque, the
default). For a Canvas, only transparent (zero) and opaque
(non-zero) are supported.
- set_brush_rgb(r, g, b, optional alpha = 255)
- specify the brush color with integer or double RGB values
from 0 to 255 and alpha as described for set_brush_color().
- set_font(size, family, style, weight, underline, name)
- set the font that will be used by subsequent calls to
draw_text(). See the description of set_font() under
Graphical Objects, above.
- set_text_color(color, optional alpha = 255)
- set the color (a string or Wxs_color object)
with which to draw text. The
alpha value is an integer or double from 0 (transparent) to
255 (opaque, the default). For a Canvas, only transparent
(zero) and opaque (non-zero) are supported.
- set_text_rgb(r, g, b, optional alpha = 255)
- specify the text color with integer or double RGB values
from 0 to 255 and alpha as described for set_text_color().
- clear(color)
- fill the entire canvas with a solid color
- clear_rgb(r, g, b)
- fill the entire canvas with a solid color
- refresh(erase)
- notify wxWidgets that a change has occurred requiring a
graphical update. If erase is true, the canvas will be
erased first.
- Scrolled(parent, x, y, w, h)
- Create a scrollable panel. The panel is initialized to the
size of the container. The virtual (contained) panel size can be
changed using the following methods. Scrollbars are
automatically created when a dimension of the contained panel
exceeds the dimensions of the container (set when the Scrolled
is created and changeable with set_size).
- set_virtualsize(w, h)
- set the size of the virtual scrollable panel.
- get_virtualwidth()
- get the width of the virtual scrollable panel.
- get_virtualheight()
- get the height of the virtual scrollable panel.
- scroll(x, y)
- Scroll to location x, y
- Scrolled_canvas(parent, x, y, w, h)
- Create a scrollable canvas. The canvas is initialized to the
size of a containing window. The virtual canvas size can be
changed using the following methods. Scrollbars are
automatically created when a dimension of the contained canvas
exceeds the dimensions of the container (set when the
Scrolled_canvas is created and changeable with set_size). A
scrolled canvas is a subclass of Canvas. See Canvas above for
details about defining a subclass and overriding paint in order
to draw on the scrollable canvas.
- set_virtualsize(w, h)
- set the size of the virtual scrollable panel.
- get_virtualwidth()
- get the width of the virtual scrollable panel.
- get_virtualheight()
- get the height of the virtual scrollable panel.
- scroll(x, y)
- Scroll to location x, y
- Window(title, x, y, w, h)
- Creates a top-level window with title (a string) as title.
When the window size changes, the on_size(x, y) method is
called. Subclasses of Window can override on_size(), e.g. to
grow or shrink objects in the window when the size changes.
Windows have a couple of special methods:
- show_status(flag)
- Windows can display a status region. If flag is nil
(false), do not show the status region. If flag is not nil,
show the status region. (The current implementation creates
and clears the status bar regardless of the flag value.)
- set_status(status)
- Display status (a string) in the window status region. You
must have previously created a status bar using show_status
for this method to have any effect.
- set_fullscreen(flag)
- Set the window to be full screen (or not) depending on
flag
- get_menu(label)
- Retrieve the Menu object with the given label for this
window, or if no such menu exists, create and return Menu
with that label.
Windows receive some special events:
- WXS_SIZE_CHANGED
- The window size has changed.
- WXS_CLOSE_WINDOW
- The window is about to be closed and deleted. However, the
wxSerpent object representing the window still exists.
Calling methods of the wxSerpent Window object may do
nothing or may cause wxSerpent to crash. Simple applications
will create windows and controls during initialization and
make no further changes. These applications can ignore
WXS_CLOSE_WINDOW events, and need not even set the
- <tt>method</tt> of the Window or write a
handler. Applications that store new windows in globals or
that use default_window and create new controls or
change controls or change the size or position of these
windows should handle WXS_CLOSE_WINDOW. If the handler
returns true (non-nil), the window will remain open; thus,
the close button can be deactivated. Otherwise, the handler
should actively set the stored window references to nil when
the window closes. Code that updates the window in any way
should first test if the window reference is nil, and if so,
either the window can be regenerated or the operation must
be skipped.
Dialog Boxes for Requesting Input
You can request the user to enter a file, a number, or text using
dialog boxes.
- wxs_file_selector(message, path, default, extension, wildcard,
flags, window_id)
- Opens a dialog to browse for a file. The message is a string
that is displayed in the dialog box to prompt the user for the
file. The path is the initial path where the dialog box should
look for files, where the empty string means the current path.
The default is the default file name, where the empty string
means no default file name. The extension specifies the file
extension (also called the type extension) for default. The
wildcard specifies what files are displayed in the file selector
(use "*.*" to list all files). See also ::wxFileSelector in
wxWidgets documentation for more wildcard syntax, which can
specify multiple types of file. The flags is a combination of
WXS_FILE_OPEN, WXS_FILE_SAVE, WXS_FILE_OVERWRITE_PROMPT,
WXS_FILE_HIDE_READONLY, or WXS_FILE_MUST_EXIST. The window_id is
the id for the window in which the dialog is opened. The
result is either a path to the selected file, which does not
necessarily exist (e.g. without WXS_FILE_MUST_EXIST), or if
the users cancels the selection, the empty string may be returned.
- wxs_dir_selector(message, default, style, window_id)
- Opens a dialog to browse for a directory. The message is a
string that is displayed in the dialog box to prompt the user
for the directory. The path is the initial path where the dialog
box should look, where the empty string means the current path.
The default is the default directory name, where the empty
string means no default directory name. Style is passed onto
wxWidgets but apparently should always be 0. The window_id is
the id for the window in which the dialog is opened.
- wxs_get_number(message, prompt, caption, number, min, max,
window_id)
- Opens a dialog to get an integer. The message is a possible
multi-line string to be displayed above a single line prompt
string. The dialog window title is specified by the string
caption. The number is the default value, and the number entered
by the user must be in the range min to max, both of which
should be positive. The dialog is centered on the window given
by window_id. -1 is returned if the user enters an invalid value
or cancels.
- wxs_get_text(message, caption, default, window_id)
- Opens a dialog to get text from the user. The dialog box
contains message, a string, and the dialog window title is
specified by caption, a string. The default return value is
given by default, a string, and the dialog box is opened at the
center of the window given by window_id. If the user presses
Cancel, the empty string is returned.
- wxs_message_box(message, caption, style, window_id)
- Opens a dialog box to display message, a string, in a window
with the title specified by caption, a string. The style is a
combination (logical or) of WXS_STYLE_YES_NO, WXS_STYLE_CANCEL,
WXS_STYLE_OK, WXS_STYLE_EXCLAMATION, WXS_STYLE_ERROR,
WXS_STYLE_QUESTION, or WXS_STYLE_INFORMATION. The return value
is one of the following: WXS_MSG_YES, WXS_MSG_NO,
WXS_MSG_CANCEL, WXS_MSG_OK.
Timer
In wxserpent, the graphic interface does not really become
operational until you finish loading the initial program. Recall
that the default startup action is to load init.srp
which may load other files. After loading, control is passed to
the wxWindows library. Depending on how graphical objects were
created and initialized, various functions and methods will be
called in response to user actions. If you want other processing
to take place, your only option is to have wxWindows call a
function periodically. This can be started by calling wxs_timer_start,
as described below.
- wxs_timer_start(interval, function)
- Starts calling the function named by the function parameter,
a symbol, every interval ticks. Under Windows (at least), a
tick is 1/100 seconds. The function should be defined and
should take no parameters.
Error Handling and Debugging
Be sure to see Section
“Debugging” in the Serpent page for additional
ideas including how to set breakpoints (of a sort).
Error handling in wxSerpent uses the same simple
debugger as Serpent. Remember to enable debugging by putting the statement
require "debug"
early in your program.
In wxserpent, there is no interactive command line, and output is
directed to a window, so when the debugger waits for input, what
happens? Blocking input in wxserpent is implemented by calling a
pop-up dialog box to retrieve type-in. This usually puts a dialog
box right in front of your application, which gets in your way,
and if you are in the debugger, typing something to the dialog box
will only encourage it to ask you another question.
Type ! to
exit, ? for a stack trace, or > to resume (the other debugger
commands work too).
To make matters worse, printing is disabled during a paint event
(see description of Canvas) so you will not see any printed
information while drawing on a canvas object (except under Linux,
where stdout is echoed to the shell window).
On Windows, text output including
debugger output is written only to stdout, which Windows does not
display! This can make it difficult to use any debugging
functions. Unless you disable it, the stack trace will go to the
log file you have set up by calling
log_enable("application.log")
If there is no log file, the debugger will attempt to open “srp.log”
as a log file before printing the stack trace. If necessary, just
kill the (wx)serpent program, then type srp.log or
open the stack trace in a text editor to study the stack trace and
any other debugging output you might have generated in your
program.
You may notice that the log file contains all text directed to
stdout, whereas the text window opened by the application contains
only text printed while not painting a canvas. When text is not
printed, a warning will eventually appear to indicate text output
was skipped.
Among the debugging commands you can see by typing
“.” (except on windows you might have
to look in the log file), two common ones to remember are:
- ">" which tells the program to resume -- since Serpent
is running in order to handle something for wxWidgets, control
will return to wxWindows. It's possible that you can resume
normal execution, but chances are good that touching another
control will tickle the same bug and raise the same error.
- The "!" debugger command should exit the program.
OpenGL Classes
If wxserpent is compiled with OpenGL functions (see installation
notes), the following classes are available:
- Glwindow(title, x, y, w, h)
- Creates a window that can be drawn upon with OpenGL. A
Glwindow is a subclass of Canvas. All of the Canvas drawing
methods are implemented by Glwindow, and alpha parameters are
used for transparency. Use refresh and paint exactly as for a
Canvas. At present, 3D methods and other OpenGL commands are not
supported.
- Glcanvas(parent, x, y, w, h)
- Works just like Canvas except with OpenGL capabilities.