MIDI Tutorial
This MIDI tutorial will help you to understand how you can use the MIDI language to control any device that uses the MIDI protocol.
MIDI Tutorial Part 1 - MIDI Messages
The MIDI language is used to transmit real time information for the playback of a piece of music.
"Real time" means that each message is sent exactly at the moment it must be interpreted by the target synthesizer (which can be a hardware synthesizer or software synthesizer).
Various messages are defined to transmit the information needed to perform the playback of music.
The important point is that the MIDI language does not define the sound itself, but only the sequence of instructions to create the sound in the target synthesizer.
The MIDI messages are sent as a time sequence of one or more bytes (8 bits). The first byte is a STATUS byte, often followed by DATA bytes with additional parameters. A STATUS byte has bit 7 set to 1 and a DATA byte has bit 7 set to 0.
The STATUS byte determines the type of the message. The number of DATA bytes that follow depend on the type of the message.
Except for some system MIDI messages, the STATUS byte contains the MIDI channel number. There are 16 possible MIDI channels, numbered from 0 to 15 in hexadecimal. In practice, musicians and software refer to the MIDI channels by counting them from 1 to 16, so that there is a difference of 1 when you program them in hexadecimal (channel "1" is coded "0", channel "10" is coded "9" and channel 16 is coded "F").
In the same MIDI cable, up to 16 MIDI channels may be used to control up to 16 different instruments playing independently.
|
MIDI RUNNING STATUS
While reading bytes coming from a MIDI message, you must know that the STATUS byte can in fact be omitted (except in the first message of that type).
In such a case, you can receive a message that only has DATA bytes. The STATUS byte is then supposed to be the same as the last STATUS byte received. This is called MIDI RUNNING STATUS. It is useful for instance to optimize transmission when a long series of the same messages are sent. An example would be a pitch bend or crescendo volume curve. You can also use this MIDI RUNNING STATUS when you generate MIDI messages, but you should care about how the target synthesizer or software will receive it, to be sure it is well interpreted. |
MIDI Tutorial Part 2 - NOTE Messages
The main messages are the NOTE ON and NOTE OFF messages.
The NOTE ON message is sent when the performer hits a key of the music keyboard. It contains parameters to specify the pitch of the note as well as the velocity (intensity of the note when it is hit).
When a synthesizer receives this message, it starts playing that note with the correct pitch and force level.
When the NOTE OFF message is received, the corresponding note is switched off by the synthesizer.
| Every NOTE ON message requires its corresponding NOTE OFF message, otherwise the note will play forever. The only exception is for percussion instruments, where it can happen that only the NOTE ON is sent, as the percussion note stops by itself automatically. But it is better practice to send the NOTE OFF in every case, because you are not sure how it could be interpreted by the synthesize receiving it. |
The NOTE ON message is structured as follows:
- Status byte : 1001 CCCC
- Data byte 1 : 0PPP PPPP
- Data byte 2 : 0VVV VVVV
where:
|
"CCCC" is the MIDI channel (from 0 to 15) "PPP PPPP" is the pitch value (from 0 to 127) "VVV VVVV" is the velocity value (from 0 to 127) |
The pitch value determines the frequency of the note to be played. It goes from 0 to 127, with the middle C note being represented by the value of 60:

The value is represented in half steps, so that C# will be 61, D will be 62,...
To transpose a note one octave higher, add 12 to its pitch value. By using MIDI, transposition is very simple as it is done simply by adding or subtracting a fixed value.
Be cautious however about the range of MIDI notes that goes from 0 to 127. By adding for instance 4 octaves (+48) to a note of value 96, the total is 144, which is outside the range and may be truncated to 16 (144 - 128) so that a very low note will result.
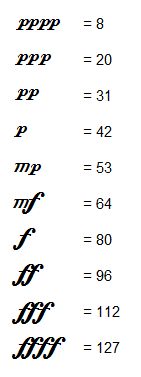
The velocity value normally goes from 1 to 127, covering the range from a practically inaudible note up to the maximum note level. It basically corresponds to the scale of nuances found in music notation, as follows (it is more indicative than exact values):
In basic synthesizers, the velocity value is used only to determine the force with which the note is played, the only effect being a note that is louder or softer in volume.
In more sophisticated synthesizer, this value will also affect the sound quality. Indeed, on a real piano, hitting a note harder will not only affect its loudness but also the quality of the sound itself, the timber. This is practically the case with any real instrument.
There is a special case if the velocity is set to zero. The NOTE ON message then has the same meaning as a NOTE OFF message, switching the note off.
The NOTE OFF message is structured as follows:
- Status byte : 1000 CCCC
- Data byte 1 : 0PPP PPPP
- Data byte 2 : 0VVV VVVV
where CCCC and PPPPPPP have the same meaning as above. The VVVVVVV is the release velocity, which is very rarely used. By default, set it to zero.
MIDI Tutorial Part 3 - Playing notes and chords
When you send a NOTE ON message to a synthesizer, this note starts playing. Meanwhile, you can send other NOTE ON messages, with different note pitches, so as to hear a chord. However, you need to keep track of the notes that are playing, so that you can send a corresponding NOTE OFF for each note, otherwise there will be stuck notes playing forever.
Let's take an example. What are the MIDI messages needed to play the following measure?

As the time dimension must be present to hear the music, here is the time sequence of the MIDI messages that you need to send to a synthesizer to have it play the above music on channel 1 (remember, coded as 0), with a velocity of 64 (mezzo forte), in hexadecimal (0x means hexadecimal notation):
- t=0 : 0x90 - 0x40 - 0x40 (Start of E3 note, pitch = 64)
- t=0 : 0x90 - 0x43 - 0x40 (Start of G3 note, pitch= 67)
- t=1 : 0x80 - 0x43 - 0x00 (End of G3 note, pitch=67)
- t=1 : 0x90 - 0x45 - 0x40 (Start of A3 note, pitch=69)
- t=2 : 0x80 - 0x45 - 0x00 (End of A3 note, pitch=69)
- t=2 : 0x80 - 0x40 - 0x00 (End of E3 note, pitch=64)
- t=2 : 0x90 - 0x3C - 0x40 (Start of C3 note, pitch = 60)
- t=2 : 0x90 - 0x47 - 0x40 (Start of B3 note, pitch= 71)
- t=3 : 0x80 - 0x47 - 0x00 (End of B3 note, pitch= 71)
- t=3 : 0x90 - 0x48 - 0x40 (Start of C4 note, pitch= 72)
- t=4 : 0x80 - 0x48 - 0x00 (End of C4 note, pitch= 72)
- t=4 : 0x80 - 0x3C - 0x40 (End of C3 note, pitch = 60)
"t" represents the time in seconds. The score plays at 60 beats per minute, so each quarter note is 1 second.
MIDI Tutorial Part 4 - Selecting Instruments
Up to now, there is no information to tell the synthesizer what sound must be used to play the notes. The synthesizer would probably use the piano or its default instrument.
There is a MIDI message to specify an instrument from a predefined list of 128 sounds. In theory, each synthesizer may have its own custom list of instruments, but the "General Midi (GM)" standard defines a list of 128 instruments that simplifies compatibility. Most synthesizer have at least a compatibility mode with the GM standard. You can find the list of General MIDI instruments here :
The MIDI message used to specify the instrument is called a "program change" message. It has one STATUS byte and one DATA byte :
- Status byte : 1100 CCCC
- Data byte 1 : 0XXX XXXX
where CCCC is the MIDI channel (0 to 15) and XXXXXXX is the instrument number from 0 to 127. Similarly to MIDI channels, you will often see that the instrument numbers in synthesizers and in GM lists, are numbered from 1 to 128 so you also need to add or subtract 1 for the conversion.
For instance, the trumpet instrument has number 57 in the GM list, so in the above MIDI message you must set XXXXXXX = 56 to get the correct instrument in the target synthesizer.
The notes sent to the synthesizer after that message will be played with a trumpet sound.
|
Sound Quality of Instruments
You will notice that the sound quality as produced by the target synthesizer has nothing to do with MIDI messages. After receiving a program change specifying the trumpet instrument, a cheap, low quality sound card synthesizer may play a pretty bad trumpet sound, while a high quality sampler may render a beautiful and realistic trumpet sound.
This is the main problem with MIDI sequences, is that you have no control of the final quality of reproduction, as you do not know what is the synthesizer that will play it when you publish a MIDI sequence. |
MIDI Tutorial Part 5 - Drum instruments
Drum instruments form a special case, as they do not have a specific pitch like on a piano or trumpet. A specific MIDI channel is used to transmit the playback of drum instruments. In General Midi, it is channel 10, but you will find synthesizers that can be programmed to receive drums on any channel.
In the case of a channel assigned to drum instruments (and also for special sound effects often included in synthesizers), the NOTE ON and NOTE OFF message information for the pitch is in fact used to select which drum or sound effect will play.
For General MIDI, you can find the standard list of drum instruments here (at the end of that page):
General MIDI drum instruments list
For instance, to play a bass drum instrument on channel 10, send the NOTE ON message as follows:
- 0x99 0x23 0x40
0x99 is the STATUS byte for the NOTE ON message, using channel 10 (coded 9). 0x23 is decimal 35 which is the note number used for the acoustic bass drum in the GM list above. 0x40 is decimal 64 for a velocity around the mezzo forte nuance. You should then send the NOTE OFF message as follows:
- 0x89 0x23 0x00
MIDI Tutorial Part 6 - Using MIDI Channels
The MIDI protocol handles up to 16 different MIDI channels. Each channel has its own status, for instance the current instrument defined, the notes that are currently playing, as well as other values like the volume, the panoramic,...
By using different MIDI channels, you can define a specific instrument for each. By sending notes on the corresponding MIDI channels, these notes will sound with the given instruments.
Here is a score example with three instruments.
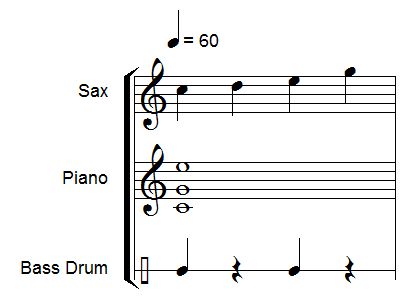
The sax, piano and bass drum will use respectively channels 1, 2 and 10. The MIDI message sequence is the following.
First send the program changes to specify the instruments to use on each channel:
- t=0 : 0xC0 - 0x41 (Alto Sax = 66 ==> coded 65 = 0x41)
- t=0 : 0xC1 - 0x00 (Piano = 1 ==> coded 0)
- t=0 : 0xC9 - 0x00 (Standard Drums Kit = 1 ==> coded 0)
For drums on General MIDI it is the program change 1 (coded 0) which is the standard drums kit. Some synthesizers also propose Jazz kits, Orchestral kits, Electronic kits,... with different drum sounds).
Then we can send the notes as already explained. Notice that here, we have used the NOTE ON message with a velocity of zero, as the equivalent of the NOTE OFF message. This is often used in practice.
- t=0 : 0x90 - 0x48 - 0x40 (Start sax C4, pitch = 72 = 0x48)
- t=0 : 0x91 - 0x3C - 0x40 (Start piano C3, pitch = 60 = 0x3C)
- t=0 : 0x91 - 0x43 - 0x40 (Start piano G3, pitch = 67 = 0x43)
- t=0 : 0x91 - 0x4C - 0x40 (Start piano E4, pitch = 76 = 0x4C)
- t=0 : 0x99 - 0x23 - 0x40 (Start Bass Drum = 35 = 0x23)
- t=1 : 0x90 - 0x48 - 0x00 (Stop sax C4, pitch = 72 = 0x48)
- t=1 : 0x99 - 0x23 - 0x00 (Stop Bass Drum = 35 = 0x23)
- t=1 : 0x90 - 0x4A - 0x40 (Start sax D4, pitch = 74 = 0x4A)
- t=2 : 0x90 - 0x4A - 0x00 (Stop sax D4, pitch = 74 = 0x4A)
- t=2 : 0x90 - 0x4C - 0x40 (Start sax E4, pitch = 76 = 0x4C)
- t=2 : 0x99 - 0x23 - 0x40 (Start Bass Drum = 35 = 0x23)
- t=3 : 0x90 - 0x4C - 0x00 (Stop sax E4, pitch = 76 = 0x4C)
- t=3 : 0x99 - 0x23 - 0x00 (Stop Bass Drum = 35 = 0x23)
- t=3 : 0x90 - 0x4F - 0x40 (Start sax G4, pitch = 79 = 0x4F)
- t=4 : 0x90 - 0x4F - 0x00 (Stop sax G4, pitch = 79 = 0x4F)
- t=4 : 0x91 - 0x3C - 0x00 (Stop piano C3, pitch = 60 = 0x3C)
- t=4 : 0x91 - 0x43 - 0x00 (Stop piano G3, pitch = 67 = 0x43)
- t=4 : 0x91 - 0x4C - 0x00 (Stop piano E4, pitch = 76 = 0x4C)
MIDI Tutorial Part 7 - MIDI Controllers
There are 128 MIDI controllers defined, but only a few of them are used in practice. The purpose of a MIDI controller is to set a value of a parameter in the synthesizer playing the notes, like the volume, the panoramic (position in space from left to right in stereo), the level of reverberation,...
The message is constructed as follows:
- Status byte : 1011 CCCC
- Data byte 1 : 0NNN NNNN
- Data byte 2 : 0VVV VVVV
where CCCC is the MIDI channel, NNNNNNN is the controller number (from 0 to 127) and VVVVVVV is the value assigned to the controller (also from 0 to 127).
The most common controller numbers are the following:
- 0 = Sound bank selection (MSB)
- 1 = Modulation wheel, often assigned to a vibrato or tremolo effect.
- 7 = Volume level of the instrument
- 10 = Panoramic (0 = left; 64 = center; 127 = right)
- 11 = Expression (sometimes used also for volume control or similar, depending on the synthesizer)
- 32 = Sound bank selection (LSB)
- 64 = Sustain pedal (0 = no pedal; >= 64 => pedal ON)
- 121 = All controllers off (this message clears all the controller values for this channel, back to their default values)
- 123 = All notes off (this message stops all the notes that are currently playing)
Volume and velocity
For instance, if you want to set the volume to a value of 100 (in the 0 to 127 range of values, 100 = 0x64) for the instrument playing on channel 1 (coded 0), you can send the following message:
- 0xB0 - 0x07 - 0x64
The volume change has an impact on all notes currently playing as well as the notes that will start playing later. The synthesizer keeps that volume level until another volume level is sent.
Remember that the velocity of a note is sent with the NOTE ON message itself. The velocity cannot be changed once the note has been started, so you can use the volume controller to change the level of the note after it has been started.
To create a crescendo, you need to send a sequence of increasing volume values.
You must always balance out the velocity and volume values to use, so that both are in a correct range of value. If one of them is too low, the notes may not be heard correctly even if the other value is at its maximal value. The effect of both values are multiplicative to determine the real loudness of the note.
Instrument selection
As we have seen before, you can select a sound on a synthesizer with the 128 values of the program change message. The sound bank selection messages (LSB Least Significant Byte and MSB Most Significant Byte) are used in addition to the program change message.
A synthesizer may contain one or more sound banks, each containing 128 sounds. If you want to use a specific sound bank of the synthesizer, you must first activate the new bank and then send the program change message.
As an example, if you want to use sound number 3 (encoded 2) on channel 1 (coded 0) in the bank with specification LSB=1; MSB=5, you must send the following sequence of MIDI messages:
- 0xB0 - 0x00 - 0x05 (MSB sound bank selection)
- 0xB0 - 0x20 - 0x01 (LSB sound bank selection)
- 0xC0 - 0x02 (sound selection in the current sound bank)
After receiving these messages, the synthesizer will play the following notes with that specific sound.
As the MSB and LSB can range from 0 to 127, there is a total of 128 x 128 = 16384 possible sound bank to be selected. In practice, only a few are implemented.
The information about the program change numbers and the sound banks available is to be found in the MIDI implementation chart and MIDI specifications of the synthesizer you are using.
MIDI Tutorial Part 8 - Pitch Bend
The Pitch Bend message is used to vary the pitch of the notes that are playing on the current MIDI channel. The message is the following:
- Status byte : 1110 CCCC
- Data byte 1 : 0LLL LLLL
- Data byte 2 : 0MMM MMMM
where CCCC is the MIDI channel, LLLLLLL is the LSB of the pitch bend value and MMMMMMM is the MSB. The 14 bit value of the pitch bend is defined so that a value of 0x2000 is the center corresponding to the normal pitch of the note (no pitch change). Using numbers above 0x2000 (up to 0x3FFF) will increase the pitch and using numbers below (down to 0x0000) will decrease the pitch. The range of pitch change is symmetric (up and down) and can often be adjusted in the synthesizer itself. The most common range value is +/- 2 semitones around the standard note pitch.
Pitch bend is often used to create glissando and guitar bend effects. To achieve this, you must send a continuous sequence of pitch bend messages, to vary the pitch in real time, often enough so that the ear does not hear too much steps in the curve.
For instance, to "bend" a note of a semitone higher, you must send a value of 0x3000, which will be sent as:
- 0xE0 - 0x00 - 0x60
Indeed, the value 0x3000 must be split into two 7-bit values, giving 0x60 and 0x00 for the MSB and LSB parts.
MIDI Tutorial Part 9 - Resetting notes
As we have seen, all NOTE ON message should have its corresponding NOTE OFF message, otherwise the note will continue to sound forever.
There are cases where you want to reset whatever notes are playing. There are basically 4 ways to do this. Some synthesizer do not accept them all, so it is interesting to offer the different possibilities.
1 - Using MIDI controller 123
If you send a MIDI controller 123 on one MIDI channel, the synthesizer will stop all notes playing on that channel. To reset all MIDI channels, send that message for each channel. Please note that some synthesizer do not respond to this message.
2 -MIDI Reset message
This is a one status byte message 0xFF, without data bytes. It should reset the synthesizer to its power-on default, so it also stops all notes playing. Use this message sparingly, as it reset the full synthesizer, not only the notes playing.
3 - MIDI NOTE OFF
You can also send, for each channel (0 to 15) and each note pitch (0 to 127) one MIDI NOTE OFF message. This is the total solution, but requires a lot of MIDI messages to be sent, which may have some reaction time according to the MIDI hardware system you use.
4 - MIDI NOTE OFF - Optimized
In this case, use a table to keep track of the NOTE ON and OFF messages you send for each channel. A buffer of 128 bytes for each channel, representing the number of NOTE ON messages sent to that note,should be incremented by a NOTE ON and decremented by a NOTE OFF. Then, when you want to reset every note, simply go through that table and send a NOTE OFF to each note that is still playing.
MIDI Tutorial - Going further...
The above information covers the basic use of MIDI for many playback situations. To find all information about the more advanced MIDI messages and conventions, you can go on the site of the MIDI Manufacturers Association, that you can easily find with Google.
If you have any question, feel free to contact me at :
info@arpegemusic.com
Musically yours,
Dominique Vandenneucker
Music Software Designer
since 1992 at Arpege Music
Back from "MIDI Tutorial" page to "Music Software Development" page